
[ad_1]
This post shows how to check the file path of mounted ISO on a Windows 11/10 PC. This comes in handy when you don’t remember the actual location of the mounted ISO image file stored on your PC. We have covered some easy options to find the file path or location of a single ISO file or all mounted ISO files. Apart from the ISO file, you can use these options to find the file path of mounted IMG file(s).
How to check File Path of Mounted ISO in Windows 11
There are five native ways to check the file path of mounted ISO or IMG image file(s) on a Windows 11/10 computer. These are:
- Find the file path of the mounted ISO using the Search box
- Check the file path of the mounted ISO file using the Get-Volume command
- Check the file path of all mounted ISO images via the Get-Volume command
- Find the file path of the mounted ISO using the Get-DiskImage command
- Check the file path of all mounted ISO image files with the DISKPART command.
Let’s check these options.
1] Find the file path of the mounted ISO using the Search box
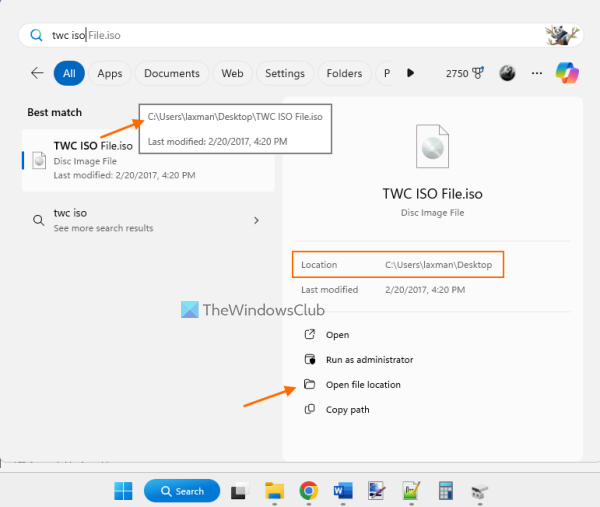
This option is useful if you know the file name of the mounted ISO image. Click on the Search box and type the name of the ISO file that you’ve mounted on your Windows 11 PC. When the search results appear, select the file, and click on the Open file location option (on the right section). This will open the ISO image location with the ISO file selected automatically. The file location is also visible on the right section of the Windows Search as highlighted in the image above.
Alternatively, you can also place the mouse cursor on the file name in the search result, and you will see the file path (location, folder, and sub-folders) of that ISO image in a pop-up description.
Related: How to search for files from the MS-DOS Command Prompt
2] Check the file path of the mounted ISO file using the Get-Volume command
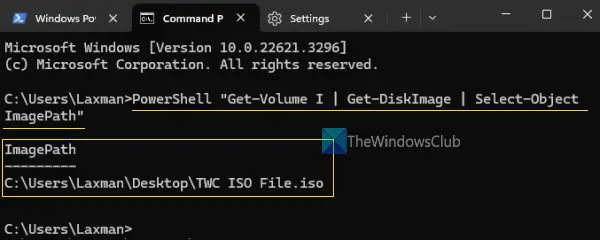
You can use Windows Terminal with the Get-Volume command via Command Prompt profile or Windows PowerShell profile to check the file path of the mounted ISO image.
Use the Search box or Start menu to open Windows Terminal on your Windows 11 PC. Now, to check the file path of the mounted ISO with the Command Prompt profile, execute the following command:
PowerShell "Get-Volume H | Get-DiskImage | Select-Object ImagePath"
Replace H with the actual volume name (say J or L) on which your ISO file is mounted. Wait for a few seconds and the image path (under the ImagePath output) along with the ISO file name will appear.
If you want to find the mounted ISO file location or file path using PowerShell in the Windows Terminal, then open the PowerShell profile, and execute this command:
Get-Volume I | Get-DiskImage | Select-Object ImagePath
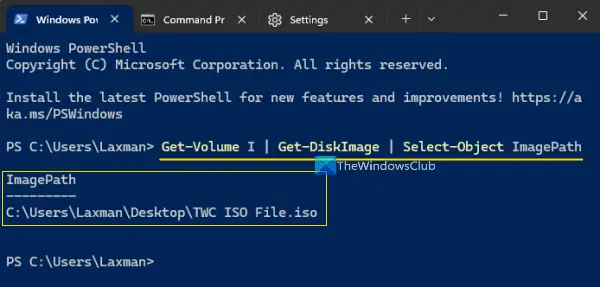
Again, replace I in the above command with the actual volume name.
3] Check the file path of all mounted ISO images via the Get-Volume command
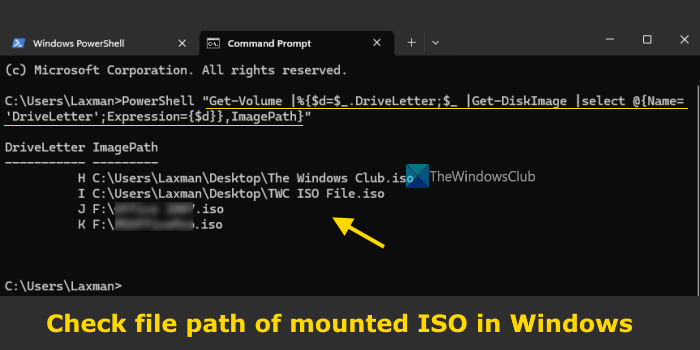
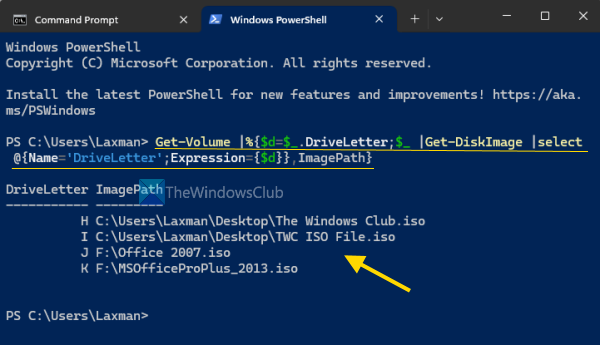
If you have mounted more than one ISO image on your Windows 11 system, then the Get-Volume command can also be used in Windows Terminal to view the path or location of all those ISO images at once.
For this, open the Windows Terminal with the Command Prompt profile, and run the command given below:
PowerShell "Get-Volume |%$d=$_.DriveLetter;$_ "
You will get a list of all mounted ISO files along with the drive letter and image path.
To show the location of all mounted ISO files using the Get-Volume command in Windows Terminal with PowerShell profile, use the following command:
Get-Volume |%$d=$_.DriveLetter;$_
Read: Can’t delete ISO file as the file is open in System
4] Find the file path of the mounted ISO using the Get-DiskImage command
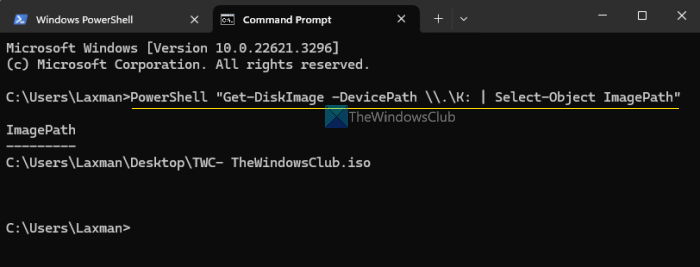
The Get-DiskImage command is used to get one or more disk image objects (ISO image or virtual hard disk) and it also helps to find the file path of a mounted ISO. Like the above options, this command can be used with Windows Terminal in both PowerShell and Command Prompt profiles.
To get the mounted ISO location using Windows Terminal with Command Prompt, you need to use this command:
PowerShell "Get-DiskImage -DevicePath \\.\K: | Select-Object ImagePath"
Here, replace K with the drive letter (say L or G) where your ISO file is mounted.
And to get the location of the mounted ISO file using the PowerShell profile in Windows Terminal, enter this command:
Get-DiskImage -DevicePath \\.\H: | Select-Object ImagePath
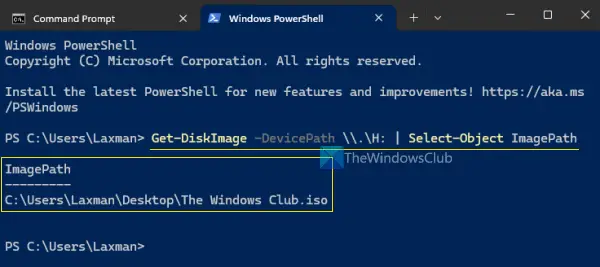
Change drive letter H in the above command with the drive letter assigned to the mounted ISO image.
5] Check the file path of all mounted ISO image files with the DISKPART command
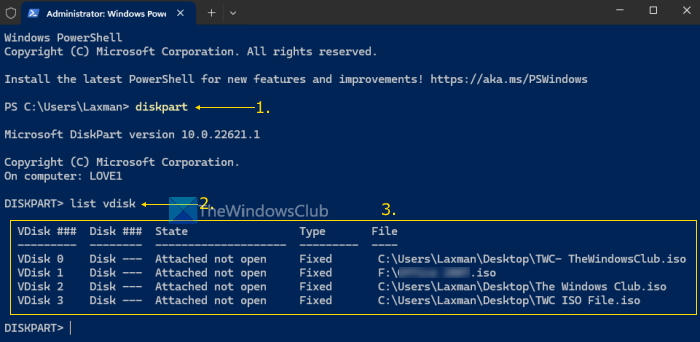
The DISKPART command is used to manage hard drives, virtual disks, partitions, and volumes. In addition, you can use the DISKPART command to get a list of all mounted ISO image files with their location or file path.
Open the Command Prompt window or PowerShell with administrative privileges. You can also open Windows Terminal as an administrator in your Windows 11 computer and open CMD or PowerShell profile. First, execute the diskpart command and then the list vdisk command.
This will display a list of all virtual drives (including ISO and IMG image files). For each virtual drive, you will get the disk or volume number, disk state, disk type, and file information column (which shows the file path or location of ISO image files).
That’s all. I hope this is helpful.
How do I know where ISO is mounted?
All the mounted ISO image files are located under the This PC section of File Explorer. Open File Explorer (Win+E) and then access the This PC section. The mounted ISO file will appear as a virtual drive there. Your mounted ISO file is also visible in the navigation pane of File Explorer. Alternatively, you can also open the Disk Management utility to check the mounted ISO including the drive letter, Capacity, Status, and other information.
How do you mount an ISO file in Windows 11?
The quicker and easier way to mount an ISO file in Windows 11 is by double-clicking on the ISO image file. It will be mounted as a virtual drive on your PC and you can open the This PC section to access the mounted ISO. Or else, right-click on an ISO file, and select the Mount option. In addition, you can also open the right-click menu of ISO file > select Open with > and click on the Windows Explorer option to mount an ISO image.
Read next: Couldn’t Mount File, The disc image file is corrupted in Windows PC.

[ad_2]
Source link
www.thewindowsclub.com