[ad_1]
Microsoft has changed the process of importing updates to WSUS (Windows Server Update Services). Now, users can run a PowerShell script to import updates into WSUS. This article shows how to import updates into WSUS using PowerShell.

How to import updates into WSUS using PowerShell
Previously, WSUS included an option to import updates from the Microsoft Update Catalog site. Users had to use the WSUS admin user interface to import updates. Microsoft has replaced this method with a PowerShell script. Now, users can download and import updates into WSUS using PowerShell.
This PowerShell script is available on the official website of Microsoft. You can copy the script from there and use it to import updates into WSUS. You can also use the WSUS admin user interface: Actions > Import Updates. After that, instead of downloading the updates, you will be redirected to documentation containing the PowerShell script.
The benefit of using this PowerShell script is you can import single as well as multiple updates into WSUS.
Prerequisites for importing updates into WSUS
There are some prerequisites that should be required to import updates into WSUS via a PowerShell script. These are:
- The WSUS administrative console should be installed on the computer that is used to import updates into WSUS. No matter whether or not the computer is the WSUS server; you can use it to import updates.
- When importing from a WSUS server, only the account that is a member of the WSUS Administrators group or the Local Administrators group should be used.
- When importing updates from a remote computer, only the account that is a member of the WSUS Administrators group and has administrative permissions on the local computer should be used. If you are using a remote computer, it should be able to reach the WSUS server over the network.
The process to import updates into WSUS using PowerShell
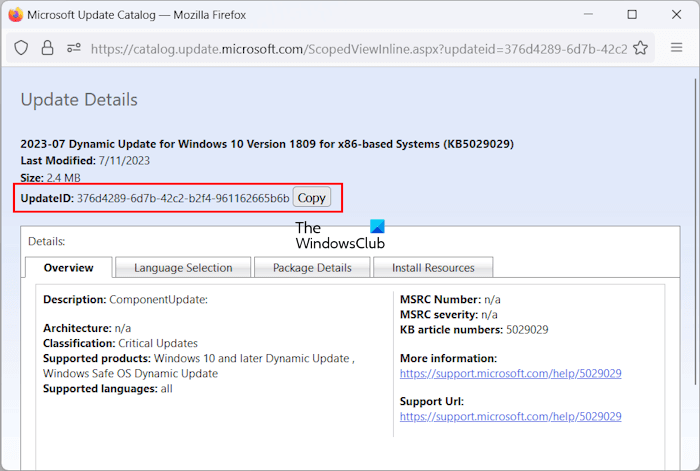
Let’s see the process to import updates into WSUS using PowerShell. While using the PowerShell script, you should have the UpdateID. You can get the UpdateID from the Microsoft Update Catalog site. The following steps will show you how to get UpdateID from the Microsoft Update Catalog site.

- Visit the Microsoft Update Catalog site.
- Search for the update you want to import into WSUS.
- Click on the required update from the search results.
- A new window will open in your web browser showing you the KB number and UpdateID.
- Click on the Copy button to copy the UpdateID.
Save this UpdateID in Notepad so that you can use it later.

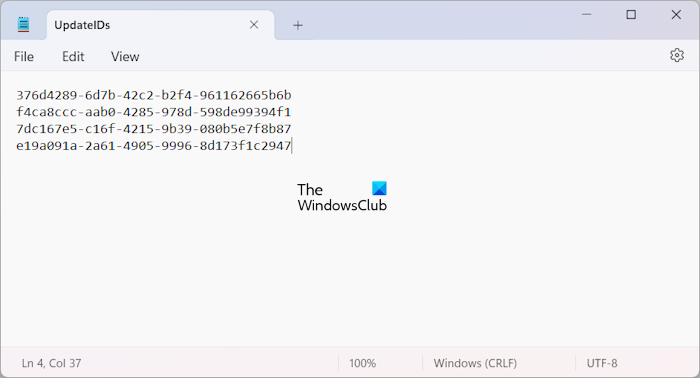
If you want to import multiple updates to WSUS, you have to create a text file containing all the required UpdateIDs. Copy the UpdateID from the Microsoft Update Catalog website and paste it into a text file with each line containing only one UpdateID refer to the above screenshot).
When you are done, save this text file with a name, say UpdateIDs.txt at a location where you can access it easily. For example, D:\The Windows Club. You will require this location while importing multiple updates into WSUS.
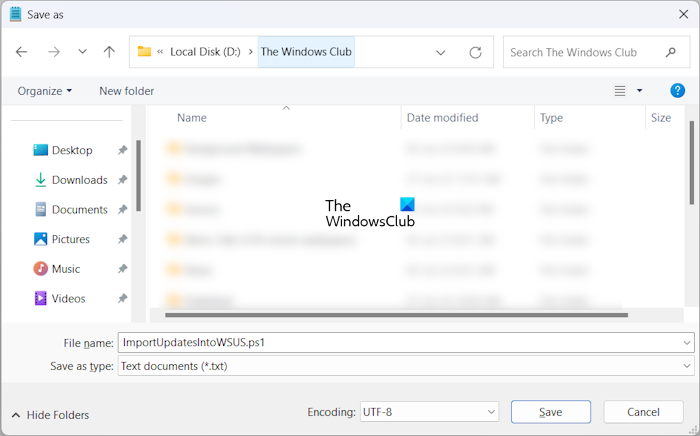
Now, copy the PowerShell script and paste it into a text file. You can use Notepad for this purpose. Save this text file with the name ImportUpdatesIntoWSUS and .psl extension. Follow the steps below:

- After pasting the PowerShell script into Notepad, press the Ctrl + S keys.
- Type ImportUpdatesIntoWSUS.psl in the File name field.
- Click Save.
Remember the save location of this file, as you will require it later.
The PowerShell script to import update(s) into Windows Server Update Services is:
<complete path of ImportUpdatesIntoWSUS.psl file> [-WsusServer] <String> [-PortNumber] <Int32> [-UseSsl] [-UpdateId] <String> [-UpdateIdFilePath] <string> [<CommonParameters>]
The above script contains script parameters. You have to launch PowerShell as an administrator to run the script. While using the PowerShell script, you have to use only the required script parameters. Let’s see some examples of PowerShell scripts:
If you are signed into a WSUS server that uses a default port and you want to import a single update, the script will look like this:
.\ImportUpdateToWSUS.ps1 -UpdateId 12345678-90ab-cdef-1234-567890abcdef
Use the correct UpdateID in the above script.
If you want to import multiple updates on a WSUS server with SSL via a remote computer, the script will look like this:
.\ImportUpdateToWSUS.ps1 -WsusServer WSUSServer.contoso.com -PortNumber 8531 -UseSsl -UpdateIdFilePath D:\The Windows Club\UpdateIDs.txt
You have to use the correct path where you have saved the UpdateIDs.txt file.
You will get more information about this PowerShell script and the parameters used in this script on the official website of Microsoft.
Read: Where to download Windows Server Insider Preview Builds?
How do I manually add KB to WSUS?
Every Windows Update has a specific KB number. If you know that number, you can add the update manually to WSUS. To do so, enter the KB number of the update on the Microsoft Update Catalog website and then copy its UpdateID. Now, you can use this UpdateID to add that update to WSUS.
How do I install a specific KB in PowerShell?
You can run Windows Update by using PowerShell. If you want to install a specific update and you know its KB number, you can run a command in Windows PowerShell with the KB number to install that specific update.
That’s it. I hope this helps.
Read next: An error occurred trying to connect to the WSUS server.

[ad_2]
Source link
www.thewindowsclub.com