
[ad_1]
Does Visual Studio Code fail to fetch the demanded extensions? When we search for the extension from the Marketplace, it sometimes throws an error, whereas, on some occasions, it keeps on loading the extension screen. In this post, we will see what to do if you cannot install extensions in Visual Studio Code.
Error while fetching extensions. XHR failed.

Do keep in mind that there are multiple error messages, but we are sure that you will find a perfect solution in this post.
Why can’t I install extensions in VS Code?
You might not be able to install extensions in VS Code if your Internet is slow or there are some network issues in your system. One of the first things you should do in this case is to restart the app, and if that doesn’t work, follow these solutions.
Fix Unable to install extensions in Visual Studio Code
One of the best things about VS Code is its vast library of extensions. However, some users are deprived of this library as they are unable to install extensions in Visual Studio Code. If you see Error while fetching extensions, XHR failed, follow the solutions mentioned below.
- Check your Internet Connection
- Swich to Google Public DNS
- Remove the Extension folder’s content
- Install from VSIX
Let us talk about them in detail.
VS Error while fetching extensions, XHR failed
1] Check your Internet Connection
If the extensions are not loading, check if they have enough bandwidth to do the same. Visual Studio Code needs to fetch the extensions from the web. In case it fails to do the same, it will either show an error or keep on loading. In that case, check your bandwidth. If you are actually facing some Internet crisis, reboot your router, and if that is to no avail, contact your ISP.
2] Switch to Google Public DNS
If the Marketplace is not loading in Visual Studio Code, switch to Google Public DNS. This will ensure there are no irregularities in your DNS as that will affect the working on all applications that connect to the Internet. So, follow the steps mentioned below to switch to Google Public DNS.
- Open Control Panel.
- Select Large icons from View by.
- Go to Network and Sharing Center.
- Click on Check adapter settings.
- Next up, right-click on the connected network, be it WiFi or Ethernet, and select Properties.
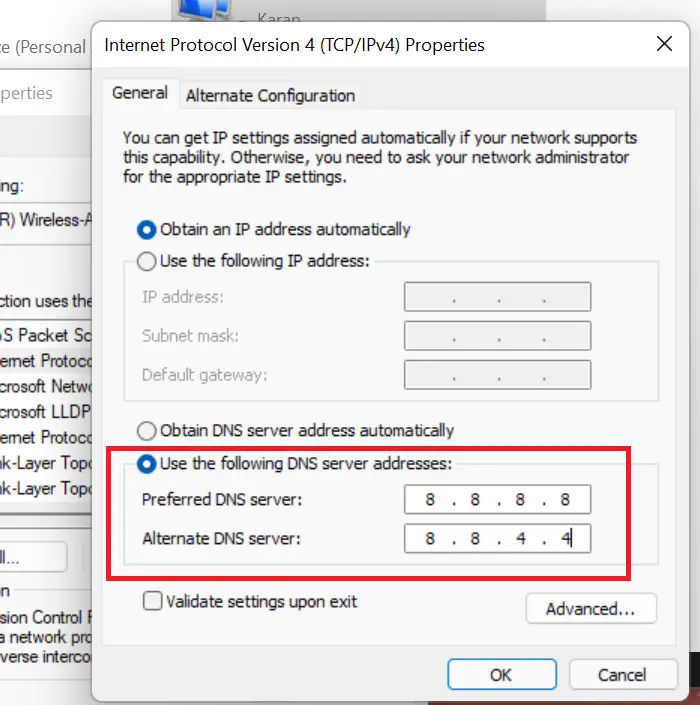
- Once the Wi-Fi or Ethernet Properties window is launched, double-click on Internet Protocol Version 4 (TCP/IPv4).
- Now, tick the box next to Use the following DNS server address and set it as follows.
- Preferred DNS server: 8.8.8.8
- Alternate DNS server: 8.8.4.4
- Now go back to the network adapter properties window, but this time, double-click on Internet Protocol Version 6 (TCP/IPv6).
- Enable Use the following DNS server address and set the DNS as:
- Preferred DNS server: 2001:4860:4860::8888
- Alternate DNS server: 2001:4860:4860::8844
- Finally, exit the window.
Once you have configured Google Public DNS, disconnect and reconnect your Internet and check if the issue is resolved.
3] Remove the Extensions folder’s content
If you have not installed any extensions before this, then it is very likely that your Extensions folder is corrupted. Remember that you can remove the folder even if you have installed extensions, but they will be removed, and you have to install them manually.
To do the same, first of all, close Visual Studio Code. For that, open Task Manager, right-click on VS Code, and select End Task.
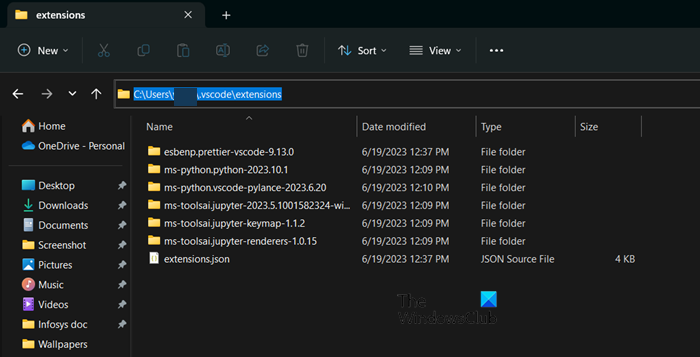
Once you have closed the app, open File Explorer, and go to the following location.
C:\Users\<username>\.vscode
Note: Replace <username> with your actual username.
Now, open the extensions folder and delete all of its content.
Read: Best Code Editors for Windows
4] Install from VSIX
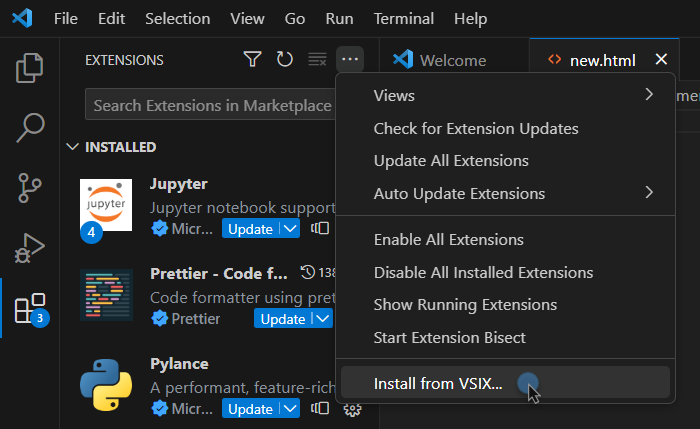
If nothing works, your last option is to go to open-vsx.org and download the extension from there. It will not be added to VS Code automatically, we have to manually install it. Once you have downloaded the extension, open Visual Studio Code, click on Extensions, then click on the three dots and select Install from VSIX. Now, navigate to the folder where you have stored the extension and follow the on-screen instructions to install it.
Hopefully, your issue will be resolved.
Read: How to disable Autoupdate in VS Code?
How do I manually install extensions in Visual Studio Code?
Installing an extension in VS Code is pretty simple, just open the app and click on the Extensions button. Now search for the extension that you want to install. Once the extension appears on the list, click on it and then click on Install.
Also Read: IntelliSense not working in VS Code.
[ad_2]
Source link
www.thewindowsclub.com