
If you want to add or remove Remote Desktop users in Windows 11 or Windows 10, here is how you can do that. It is possible to create or assign a new Remote Desktop user in Windows PC with the help of Windows Settings, Local Users and Groups, PowerShell, and Command Prompt. Here we have explained all the methods, and you can follow any of them as per your wish.
Remote Desktop functionality helps you connect a computer remotely to help fix a problem on the computer. To do that, you need to assign a user so that the account can be connected for using Remote Desktop.
How to add or remove Remote Desktop users using Windows Settings
To add or remove Remote Desktop users using Windows Settings, follow these steps:
- Press Win+I to open Windows Settings.
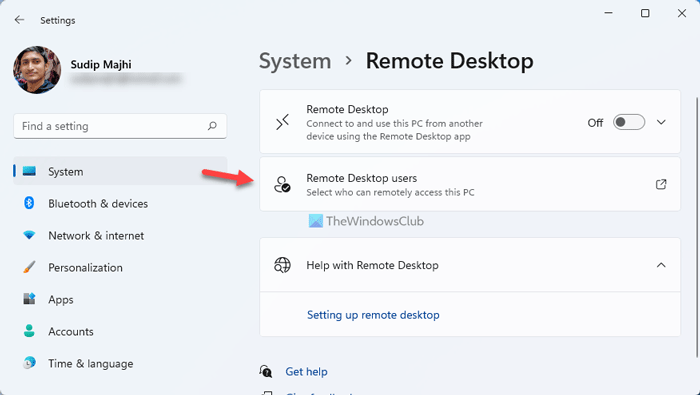
- Go to System > Remote Desktop.
- Click on the Remote Desktop users option.
- Click the Add button.
- Click the Advanced button.
- Click on the Find Now button.
- Choose the user from search results.
- Click the OK button twice.
To learn more about these steps, continue reading.
First, you need to open Windows Settings on your Windows 11/10 PC. For that, you can press the Win+I. Then, make sure that you are in the System tab. If so, find the Remote Desktop option on the right-hand side. Then, click on the Remote Desktop users option.
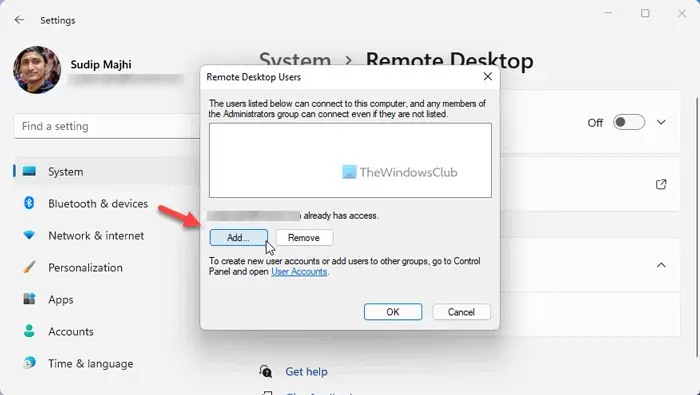
It will open the Remote Desktop Users panel on your computer. If you haven’t used the Remote Desktop earlier, you can find a blank box. To add a new user, click the Add button.

Then, click on the Advanced button and the Find Now option.
It displays all the users you can add for using the Remote Desktop on your computer. For your information, you can find Administrator, ALL APPLICATION PACKAGES, ANONYMOUS LOGON, CREATOR GROUP, CREATOR OWNER, and so on. You need to choose the user you want to allow to access the Remote Desktop on your computer and click the OK button.

Following that, you can find the username in the Remote Desktop Users box or wizard. You can again click on the OK button to save the change.
This is how you can add a Remote Desktop user in Windows 11/10. However, if you want to remove a user or prevent one from using Remote Desktop, you can open the same Remote Desktop Users panel from the Windows Settings, where it displays all the users. Then, choose a user that you want to remove from the list by clicking on it once.
After that, click on the Remove button.

Once you do that, the user will be removed from the list. Then, you can click on the OK button to save the change.
How to add or remove Remote Desktop users using Local Users and Groups
To add or remove Remote Desktop users using Local Users and Groups, follow these steps:
- Press Win+I to open the Run prompt.
- Type lusrmgr.msc and hit the Enter
- Expand the Groups section.
- Double-click on the Remote Desktop Users option.
- Click on the Add button.
- Click on the Advanced button.
- Choose Users or Built-in security principalsand click the Find Now button.
- Choose a user from the list.
- Click the OK button.
- Click the OK button again to save the change.
Let’s check out these steps in detail.
First, you need to open the Local Users and Groups panel on your computer. For that, you can press the Win+R to open the Run prompt, type lusrmgr.msc, and hit the Enter button. Alternatively, you can search for lusrmgr.msc in the Taskbar search box and click on the individual search result.
Then, expand the Groups section on the left side and double-click on the Remote Desktop Users menu in the middle of the screen.
It opens the Remote Desktop Users Properties panel. From here, you can add or remove new users. To add a new user, click the Add button and click on the Advanced button.

Then, select Users or Built-in security principals and click on the Find Now button. Here it displays a list of all the users you can add to the list.
You need to choose a user and click the OK button.
Then, click on the OK button again to save the change. If you want to remove a user, you need to open the Remote Desktop Users Properties panel, select the users from the list, and click on the Remove button.

Click the OK button to save the change.
How to add or remove Remote Desktop users using PowerShell
It is very straightforward to add or remove a Remote Desktop user using Windows PowerShell. You can use the Windows PowerShell or the PowerShell instance in Windows Terminal. However, to do that, you must know the exact username of the user. Otherwise, it is not possible to use this method to add or remove any user in Windows 11/10.
To get started, you need to open Windows Terminal with administrator rights. For that, press Win+X to open the WinX menu, select Windows Terminal (Admin) and click the Yes button in the UAC prompt.
Then, enter the following command to add a Remote Desktop user:
Add-LocalGroupMember -Group "Remote Desktop Users" -Member "username"
Don’t forget to replace username with the original username of the user account you want to assign as a Remote Desktop user on your computer.

However, if you want to remove a user, enter this command:
Remove-LocalGroupMember -Group "Remote Desktop Users" -Member "username"

Like the aforementioned command, you must replace username with the original username of the account you want to remove from the list.
How to add or remove Remote Desktop users using Command Prompt
To add or remove Remote Desktop users using Command Prompt, follow these steps:
Like the PowerShell method, you can open Command Prompt with administrator privilege or the Command Prompt instance in Windows Terminal. To do that, search for cmd in the Taskbar search box, click on the search result and click the Yes button.
Then, enter the following command to add a user:
net localgroup "Remote Desktop Users" "username" /add

It is mandatory to replace username with the original username of the user account.
On the other hand, if you want to remove a user, enter this command:
net localgroup "Remote Desktop Users" "username" /delete

Now you can close the window.
Read: Enable Remote Desktop using Command Prompt or PowerShell.
How do I remove users from Remote Desktop?
To remove users from Remote Desktop, you can follow any of the aforementioned guides. There are mainly four different methods you can follow to get the job done. However, if you use the Windows PowerShell or Command Prompt method, it will be less time-consuming. For the Command Prompt method, you need to open CMD with administrator privilege and enter this command: net localgroup “Remote Desktop Users” “username”/delete.
How do I add a user to Remote Desktop?
It is possible to add or remove users to Remote Desktop with the help of Windows Settings, Local Users and Groups, Command Prompt, and Windows PowerShell. All the methods are mentioned in this article, and you can follow any one of them to get the job done. However, if you use the Windows PowerShell or Command Prompt method, you must know the exact username of the user account you want to add.
That’s all! Hope it helps.
Source link
www.thewindowsclub.com