
[ad_1]
A Slideshow is a series of still pictures displayed on your desktop background or when your computer is inactive. You can easily set a picture folder as your desktop background slideshow, screensaver slideshow, or lock screen slideshow. If you want to customize the Slideshow settings on Windows 11/10 further, here is a full guide.
Where is the Slideshow option in Windows 11?
The Slideshow option from your desktop background is present inside the Personalization settings on your Windows 11 PC. You can open your Settings app and then move to Personalization > Background to access slideshow settings. To know details on how you can access and change slideshow settings, check out this post.
How to change Slideshow settings in Windows 11/10
Here are the basic steps to customize the desktop background image slideshow settings on your Windows 11/10 PC:
- Open the Settings app.
- Go to the Personalization tab.
- Click on the Background option.
- Tap on the Personalize your background drop-down option.
- Select Slideshow.
- Customize slideshow settings accordingly.
Let us discuss the above steps in detail!
First, press the Win+I hotkey to launch the Settings app and then move to the Personalization tab from the left-side pane. You can also right-click on your desktop and choose the Personalize option from the context menu to open the Personalization settings.
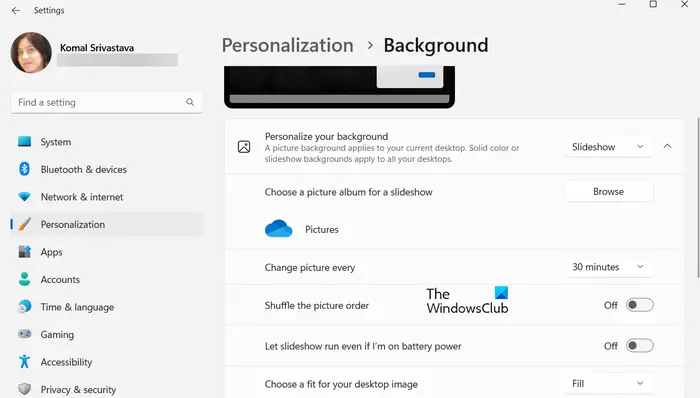
Now, click on the Background option from the right-side pane. Then, press the drop-down button associated with the Personalize your background option and choose the Slideshow option.
You can now select the picture album that you want to set as the background image slideshow on your desktop. Click on the Browse button and then select the source picture folder for your slideshow.

After that, you can configure various slideshow settings. You can set up the time after which every picture will be refreshed and changed. For that, click on the Change picture every drop-down option and set the time to 1 minute, 10 minutes, 30 minutes, 1 hour, 6 hours, or 1 day.
Besides that, you can enable or disable options like Shuffle the picture order and Let slideshow run even if I’m on battery power as per your requirement.
Once done, you can close the Settings app and the image slideshow will be displayed as per your customizations.
Read: Desktop Background Slideshow not working in Windows.
How to set up Screensaver slideshow on Windows 11/10?
If you want to change the settings of your screensaver slideshow on Windows 11/10, use the below steps:
- Click on the search option.
- Search and open Screen Saver Settings.
- Choose Photos from the Screen Saver drop-down.
- Press the Settings button.
- Select the source picture folder.
- Set up slideshow speed and shuffle picture options.
- Click on the Save button.
Firstly, open the Windows Search option and then type screensaver in the search box. From the search results, click on the Change screen saver option. This will open up the Screen Saver Settings window.
Now, click on the drop-down menu button present below the Screen saver option and choose the Photos option.

After that, press the Settings button and click on the Browse button to select the source image folder that you want to use as a screensaver slideshow. You can then change the slideshow speed to Slow, Medium, or Fast. If you want to shuffle the slideshow images, you can enable the Shuffle pictures checkbox. Else, leave it unchecked. And, press the Save button to apply new changes.
Once done, you can preview the screensaver slideshow by clicking on the Preview button. If it looks fine, click on the Apply > OK button and close the window.
Read: How to enable Wallpaper Slideshow in Windows?
How to change lock screen slideshow settings in Windows 11/10?

You can also configure your lock screen slideshow settings on Windows 11/10. For that, open Settings and go to the Personalization > Lock screen option. After that, set the Personalize your lock screen option to Slideshow and it will allow you to set various lock screen slideshow settings. These settings include Only use pictures that fit my screen, Play a slideshow when using battery power, Turn off the screen after the slideshow has played for, etc.
How do I enable slideshow in Windows 11 Photos?
The Slideshow feature in the Photos app in Windows 11 is removed now. However, users can still enable the slideshow function in the Photos app using its Legacy version. Download and install the Microsoft Photos Legacy app from Microsoft Store and open it. Go to its Album tab, add the source image folder, open the folder, right-click on the first image, and press the Slideshow option from the context menu. It will start a slideshow on your screen.
So, this is how you can set up your desktop background slideshow as well as screensaver slideshow settings on a Windows 11/10 PC.
Now read: Lock Screen slideshow not working in Windows.
[ad_2]
Source link
www.thewindowsclub.com