
[ad_1]
This post explains how to enable Local Security Authority (LSA) Protection in Windows 11. Local Security Authority is one of the several critical functions of the Windows security subsystem that authenticates a user’s identity during the sign-in process on a local computer. It verifies password changes and login attempts, creates access tokens for single sign-in sessions, and performs other Windows authentication and authorization-related tasks.
Protecting the Local Security Authority subsystem is one of the prime things you can do to protect your system and accounts from cybercriminals. Once you’ve enabled the Local Security Authority protection, you will have more control over cleartext password vulnerability and password dumping attacks.
 Protection in Windows 11")
How to enable Local Security Authority (LSA) Protection in Windows 11
Windows 11 supports the Local Security Authority protection to prevent attackers from gaining unauthorized access to your system. In this post, we will discuss three different ways of enabling the Local Security Authority (LSA) Protection in Windows 11:
- Using the Windows Security app.
- Using Windows Registry Editor.
- Using the Local Group Policy Editor.
You must be signed in as an administrator to enable the additional protection for Local Security Authority in Windows 11.
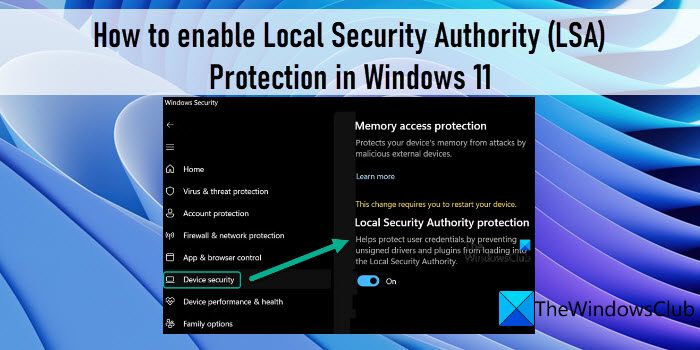
1] Enable Local Security Authority Protection using Windows Security

Windows Security is a built-in tool in Windows that constantly monitors the system for viruses, malware, and other security threats. You can use it to manage security features on your Windows 11 device, including the Local Security Authority protection.
As long as this feature is disabled, you may see the ‘Local Security Authority protection is off, Your device may be vulnerable‘ alert in Windows Security. This alert is a warning message that your device and system resources are at stake by attackers who want to gain unauthorized access to your system by stealing your credentials. So you must enable the Local Security Authority protection feature in Windows Security to fix the message and to prevent your system from cyber criminals.
- Click on the Windows search bar and type ‘windows security’.
- Click on the Windows Security option at the top of the search results.
- Click on the menu icon to expand the left menu in the Windows Security app.
- Click on the Device Security option.
- Click on the Core isolation details link under the Core isolation section.
- Turn the toggle button On for the Local Security Authority protection option.
- Click Yes in the User Account Control prompt that appears.
- Reboot your PC to apply the changes.
2] Enable Local Security Authority Protection using Registry Editor

You can also enable the Local Security Authority protection using Windows Registry. However, make sure to back up your registry or create a system restore point before you make any changes to your system through the Registry Editor.
To enable Local Security Authority protection using Registry Editor, follow these steps:
- Press the Win+R key combination and type regedit in the Run dialogue box.
- Press the Enter key.
- Click Yes in the UAC prompt.
- In the Registry Editor, navigate to the following path:
Computer\HKEY_LOCAL_MACHINE\SYSTEM\CurrentControlSet\Control\Lsa - In the right panel, double-click on RunAsPPL.
- Change the Value data to 1 and click on OK.
- Restart your PC to apply the changes.
Also Read: What is lsass.exe in Windows?
3] Enable Local Security Authority Protection using Local Group Policy Editor

You can also enable the Local Security Authority protection from the Group Policy Editor that comes bundled with Windows Pro and Enterprise editions. Home users can also access this valuable tool using the Policy Plus freeware. Again, before making any Windows Policy changes, it is crucial to create a system restore point.
Here’s how you can enable the Local Security Authority protection using the Local Group Policy editor:
- Open the Run dialogue box and type gpedit.msc.
- Press the Enter key.
- In the Local Group Policy Editor window, navigate to the following path: Computer Configuration\Administrative Templates\System\Local Security Authority.
- In the right panel, double-click on the ‘Configure LSASS to run as a protected process‘ policy.
- In the policy settings window, select the Enabled option.
- Then click on the dropdown under Configure LSA to run as a protected process and select Enabled with UEFI Lock. With this setting, LSA will run as a protected process and the configuration will be UEFI Locked, which means, it cannot be disabled remotely. If you don’t want this restriction, you can select Enabled without UEFI Lock in the dropdown.
- Click on the OK button. Then click on the Apply button.
This is how you enable the Local Security Authority (LSA) Protection in Windows 11.
Read Next: How to fix Local Security Authority cannot be contacted in Windows.
[ad_2]
Source link
www.thewindowsclub.com