
[ad_1]
Have you ever thought about creating an animated envelope for your PowerPoint presentation? Well, this tutorial is all about that. PowerPoint allows users to freely animate any objects that you include in your presentation. People will use animation in the presentation to sometimes capture the audience’s attention; some people would even create a story using the animation tools offered in PowerPoint that can enable objects to move.
How to make an Animated Envelope in PowerPoint
Follow the steps below to make an animated envelope opening effect in PowerPoint:
- Preparing the Envelope
- Making the Animation
- Pulling out the card
Create an animated envelope opening effect in PowerPoint
1] Preparing the Envelope
Click the Shapes button on the Home tab and choose a rectangle.
Then draw the rectangle on the slide.

On the Shape Format tab, click the Shape Outline button and select No Outline from the menu.
Then go to Shape Fill and choose a darker color.

On the Shape Format tab, choose a rectangle shape from the Shape gallery and then draw it over the previous shape.
Click the Shape Outline button and select No Outline from the menu.
Then click the Shape Fill button and select a lighter color that is in contrast with the previous rectangle.
Then go to the Insert tab and select Textbox in the Text group.
Draw the text box and then type the text into the textbox.
You can change the font and size of the text if you desire.
Drag the textbox onto the light-colored triangle rectangle.
Ensure it is close to the top edge of the rectangle.

Select both the textbox and the light-colored rectangle and press Ctrl G to group them.
Then go to the Shapes button and select the isosceles triangle from the menu.
Draw isosceles triangle 1.

Then click the Arrange button on the Home tab, hover the cursor over Rotate, and select the Rotate right 90 degrees.

Adjust the triangle to the left of the rectangles.
Press Ctrl D to copy the triangle.
Ensure that the copied triangle (triangle 2) is selected, then click the Arrange button on the Home tab, hover the cursor over Rotate, and select Flip Horizontal.

Place the triangle (triangle 2) on the right opposite the other triangle; ensure that both triangles are aligned.
Select one of the triangles and press Ctrl D again to copy the triangle.
Then go to the Arrange button, hover the cursor over Rotate and select Rotate left 90 degrees.

Place the triangle (triangle 3) to the left and then expand it.
You can change the color of the rectangles if you want.
Press Ctrl D to copy the triangle at the bottom.
Then go to the Arrange button, hover the cursor over Rotate and select Flip Vertical.

Place the triangle (Triangle 4) above the bottom triangle covering the text.
Press Ctrl D to copy the triangle.
Then go to the Arrange button, hover the cursor over Rotate and select Flip Vertical
 .
.
Now place the copied triangle ( triangle 5) on top of the envelope.
Select the triangle (triangle 5) on the top of the envelope, then go to Shape Format and click the Shape Outline button and select No Outline.
You can change the color of the top triangle if you want.
2] Making the Animation

Select the triangle below the top triangle (triangle 4), then click the Animation tab.

Click the More button on the Animation gallery and select More Exit Effects under the Exit section from the Animation gallery.

A Change Exit Effect dialog box will open.
Under the Moderate option, click Collapse, then click OK.

Click the Effect option button and select To Top.
Now choose the triangle (triangle 5) on the top and go to the Animation Gallery and select More Entrance Affect.

A Change Entrance Effect dialog box will open.
Under Moderate, choose Stretch, then click OK.

Click the Effect option button and select From Bottom.

Still, on the triangle (triangle 5) on top of the envelope, go to the Start button in the Timing group and choose After Previous.
Then go to the Slide Show button on the bottom of the PowerPoint interface to see how the animation will look.
3] Pulling out the card
Go to Select on the Home tab and choose Selection Pane.
A Selection Pane will appear on the right.

On the Selection Pane, the selected triangle is triangle 13 (triangle 4). Click the eye icon beside triangle 13 to make it not visual.
Select the rectangle grouped with the text box.

Then click the More button on the Animation gallery and Select Lines under the Motion Paths section.

Then go to Effect Options and click Up.

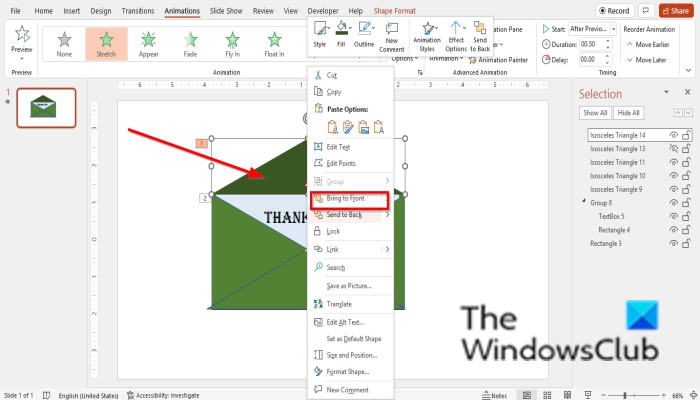
Right-click the triangle on the top (triangle 5) of the envelope and select Send to back on the context menu.
Now we are going to make the invisible triangle visible.

Go to the Selection Pane and click the cross-out eye beside Triangle 13 (triangle 4) to make it visible again.
Still, on triangle 13 (triangle 4), go to the Start button and select After Previous.
")
Click the Slide Show button to see the animation.
How do you make moving letters in PowerPoint?
Follow the steps below to make letters move in PowerPoint.
- Change the slide layout to Blank.
- Click the Insert tab and click the Textbox button in the Text group.
- Draw the textbox onto the slide and type your text.
- Then click the Animation tab and choose a Motion Path animation from the Animation gallery, such as Lines, Arc, Turn, Loop, etc.
How do I animate a shape in PowerPoint?
Follow the steps below on how to animate a shape in PowerPoint:
- Click Insert, then click the Shapes button and select a rectangle from the menu.
- Draw the rectangle on the slide like a box.
- Then click the Animation tab and choose an animation.
READ: How to create animated moving background in PowerPoint
We hope this tutorial helps you understand how to make an animated envelope in PowerPoint.
[ad_2]
Source link
www.thewindowsclub.com