![VirtualBox VBOX_E_FILE_ERROR 0x80bb0004 [Fix]](https://upgradedtamilan.com/wp-content/uploads/2024/03/vbox-e-file-error.png "VirtualBox VBOX_E_FILE_ERROR 0x80bb0004 [Fix]")
[ad_1]
When trying to attach a virtual disk to the Virtual Machine we encountered VBOX_E_FILE_ERROR (0x80bb0004) error. The VBOX error doesn’t just appear when trying to attach a disk but can also annoy the user when exporting an appliance into their virtual machine. In this post, we will see what to do when you get the error in question.

Fix VirtualBox VBOX_E_FILE_ERROR 0x80bb0004
If you get VirtualBox VBOX_E_FILE_ERROR 0x80bb0004, you need to follow the solutions mentioned below to resolve the issue.
- Re-download the .vmdk or .vdi File
- Change the path of the virtual machine to the C Drive
- Run the VBoxManage.exe file with administrative privilege
- Create a new virtual machine using an existing disk image
- Reinstall Oracle VirtualBox
- Ask the sender to review the disk image
Let’s get started.
1] Re-download the .vmdk or .vdi File
The first step to resolve the issue is to re-download the .vmdk file (if you obtained it online). This may be due to an interrupted or incomplete update. Once the download is complete, try importing the Virtual Appliance again into your VM VirtualBox Manager. If the VBOX_E_FILE_ERROR (0x80bb0004) persists, this confirms that the error is not due to a corrupted download. If the error still persists or you have not downloaded the .vmdk file from the Internet, proceed to the next method below.
2] Change the path of the virtual machine to the C Drive
Many users encounter this particular error while exporting a virtual machine into a new laptop or other alliances. It happens because the drive path of the VM doesn’t exist in that particular laptop or appliance. So for this, you need to change the path of the VM to C Drive, apart from this you can also create a new partition and transfer the VM to that new partition. Once you are done with this, reboot the VM from the drive and check whether the issue is resolved.
3] Run the VBoxManage.exe file with administrative privilege
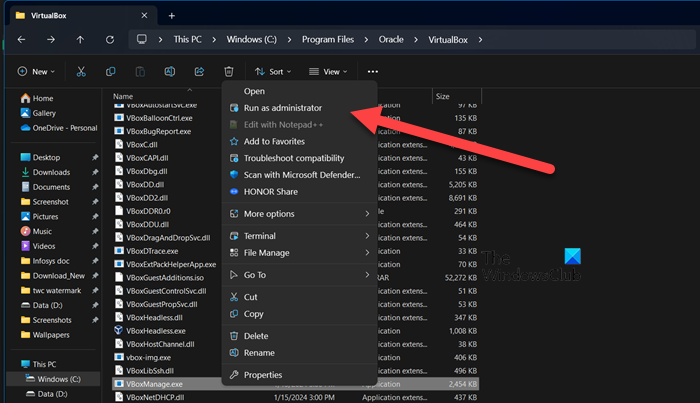
If the VBox is still stuck while importing virtual appliances, it is possible that you aren’t running the VBoxmanage.exe file with all the required privileges. A potential solution in this case would be to run the VBoxmanage.exe file as an admin. You can right-click on the file and select Run as administrator to do the same. The file will be located at – C:\Program Files\Oracle\VirtualBox.
4] Creating a new virtual machine using an existing disk image
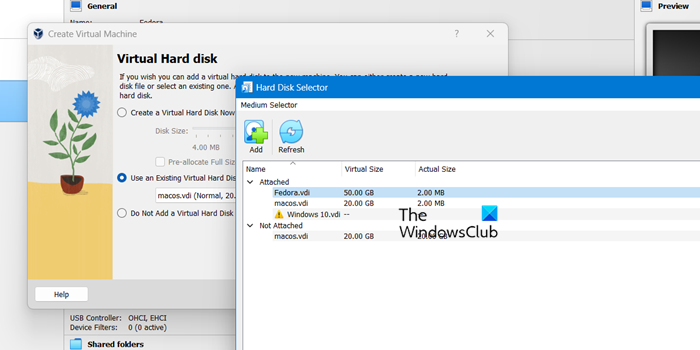
If you are encountering the VBOX_E_FILE_ERROR (0x80BB0004) error when trying to import the Appliance OVA file into VirtualBox then creating a new Virtual Machine will be helpful to resolve this error.
Follow the prescribed steps to create a new Virtual Machine:
- First, open Oracle VM VirtualBox and click on the New tab to create a new virtual machine.
- Write the Virtual Machine name, then select the Type and Version of the operating system and click on the Next button. You can skip the ISO part.
- You can select required the memory size using the toggle and click Next to continue.
- Finally, choose to Use an existing virtual hard disk file, click the folder icon, and browse to the location of the .vdi file.
After creating the new virtual machine, see if the issue has been resolved.
5] Reinstall Oracle VirtualBox
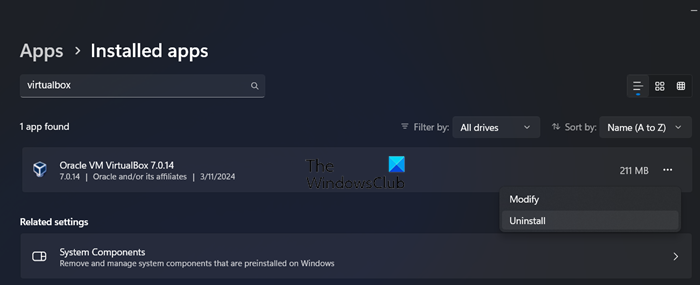
If all else fails, your last resort is to reinstall the Oracle VirtualBox as there is a high chance that the existing copy is corrupted. So, uninstall the program, reboot your computer, and then install a fresh copy from virtualbox.org. Hopefully, this will do the job.
6] Ask the sender to review the disk image
In case, reinstalling does not affect your issue, we can conclude that there is something wrong with the disk file that you received. Contact the sender and ask them to check if the file is corrupted. If there is some kind of corruption in the file, they will send you a new one that will most probably work.
That’s it!
Read: VirtualBox window stuck on Getting Ready or Boot logo
How to install VDI File on VirtualBox?
If you have created a VDI and want to add it to VirtualBox, the process is quite simple. First, select the virtual machine you want to add it to, and then click on “Settings”. Next, navigate to the “Storage” option in the left-hand pane. Once there, click on the “Empty” CD/DVD drive and select “Choose/Create a Disk Image”. Locate your VDI file and click “Open”. Now, your virtual machine has additional storage space to use as needed.
Read: VirtualBox Failed to attach the USB device to the virtual machine
How do I resize a VM disk size?
To resize a virtual machine in VirtualBox, click on File > Tools > Virtual Media Manager. Now, select the VDI image you want to edit and use the slider to change the size of the file. Finally, click on Apply > Ok.
Also Read: Fix VERR_DISK_FULL VirtualBox Could not create the clone error.
[ad_2]
Source link
www.thewindowsclub.com