
[ad_1]
The Microsoft Wi-Fi Direct Virtual Adapter is mainly used to create a wireless hotspot and allow other computers to access and use the internet through your Windows 11 or Windows 10 computer. In this post, we will show you the known methods on how to disable or remove Microsoft Wi-Fi Direct Virtual Adapter on your system.

In Windows 11/10, the Microsoft Wi-Fi Direct Virtual Adapter is used for Projecting to this PC feature which mirrors or shares the screen of other devices to your PC (or vice versa) via a direct Wi-Fi connection (using Miracast).
How to disable or remove Microsoft Wi-Fi Direct Virtual Adapter
In some cases, Device Manager displays multiple virtual adapters with an index showing as Microsoft Wi-Fi Direct Virtual Adapter #2, Microsoft WiFi Direct Virtual Adapter #3, Microsoft Virtual WiFi Miniport Adapter #4, etc – and only one of the virtual adapters can be active.
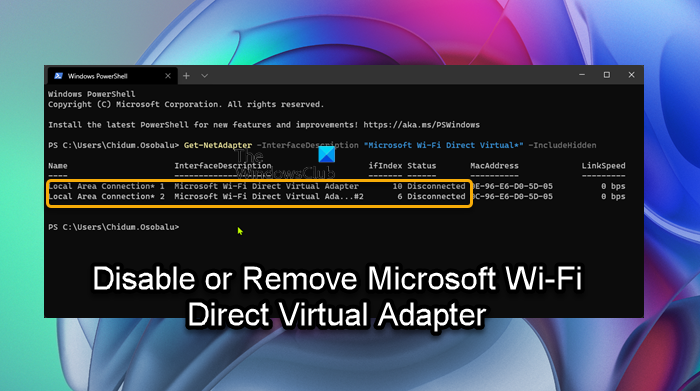
To get a list of Wi-Fi Direct Virtual Adapters on your system, run the PowerShell cmdlet below:
Get-NetAdapter -InterfaceDescription "Microsoft Wi-Fi Direct Virtual*" -IncludeHidden
When the command executes, from the output, you’ll see the adapters are disconnected as you can see from the lead-in image above. Note that Microsoft Wi-Fi Direct Virtual Adapter and Microsoft Hosted Network Virtual Adapter are different virtual adapter types.
We can disable or remove Microsoft Wi-Fi Direct Virtual Adapter in Windows 11/10 in 3 quick and easy ways. We’ll explore this topic under the methods outlined below in this section as follows:
1] Disable or remove Microsoft Wi-Fi Direct Virtual Adapter via Device Manager

To disable or remove Microsoft Wi-Fi Direct Virtual Adapter via Device Manager in Windows 11/10, do the following:
- Press Windows key + X to open Power User Menu.
- Tap M key on the keyboard to open Device Manager.
- In Device Manager, scroll down through the list of installed devices and expand the Network adapters section.
- Now, right-click on Microsoft Wi-Fi Direct Virtual Adapter.(if not listed, you’ll need to Show hidden devices).
- Select Disable device from the context menu.
- Repeat to disable or remove any other Microsoft Wi-Fi Direct Virtual Adapter entry.
- Once all the adapters have been disabled, select Action > Scan for the hardware changes option.
- Exit Device Manager when done.
If at anytime you want to enable the Microsoft Wi-Fi Direct Virtual Adapter device again, simply repeat the steps above, right-click on an entry, but this time, select Enable device.
Read: What is Wi-Fi Direct and how to tell if your computer supports it
2] Disable or remove Microsoft Wi-Fi Direct Virtual Adapter via Command Prompt

To disable or remove Microsoft Wi-Fi Direct Virtual Adapter via Command Prompt in Windows 11/10, do the following:
- Press Windows key + R to invoke the Run dialog.
- In the Run dialog box, type cmd and then press CTRL + SHIFT + ENTER to open Command Prompt in admin/elevated mode.
- In the command prompt window, type or copy/paste the command below and hit Enter to turn off the active hosted network:
netsh wlan stop hostednetwork
Now, run the command below to disable WiFi Direct Virtual Adapter:
netsh wlan set hostednetwork mode=disallow
- Exit CMD prompt when done.
If at anytime you want to enable the Microsoft Wi-Fi Direct Virtual Adapter device again, simply run the following commands one after the other in elevated CMD prompt:
netsh wlan set hostednetwork mode=allow
netsh wlan start hostednetwork
3] Disable or remove Microsoft Wi-Fi Direct Virtual Adapter via Registry Editor

You can use this method which requires you to modify the registry if you want to permanently delete the Microsoft Wi-Fi Direct Virtual Adapter instead of just temporarily disabling them. This method will reset the existing settings in the Windows registry, consequently preventing new adapters from being automatically created on computer startup.
To disable or remove Microsoft Wi-Fi Direct Virtual Adapter via Registry Editor in Windows 11/10, do the following:
Since this is a registry operation, it is recommended that you back up the registry or create a system restore point as necessary precautionary measures. Once done, you can proceed as follows:
HKEY_LOCAL_MACHINESYSTEMCurrentControlSetservicesWlansvcParametersHostedNetworkSettings
At the location, on the right-pane, right-click on HostedNetworkSettings registry key.
- Select Delete from the context menu.
- Confirm the delete operation on the prompt.
- Exit Registry Editor.
- Restart PC.
To confirm that Microsoft Wi-Fi Direct Virtual Adapter has been deleted or removed from your system, you can run the netsh wlan show hostednetwork command – the Settings should be listed as Not configured.
That’s it on how to disable or remove Microsoft Wi-Fi Direct Virtual Adapter!
Related post: Enable or Disable Wi-Fi and Ethernet adapter on Windows 11
What is Tap-Windows Adapter V9?
The Tap-Windows Adapter V9 is a virtual network interface that provides the functionality needed by various VPN clients to facilitate a VPN connection. The Tap-Windows Adapter V9 driver is installed in C:/Program Files/Tap-Windows directory.
What is Network adapter driver?
A network adapter driver is a program that allows communication between your network connections and your PC. It is recommended you update your network adapter drivers regularly in order to avoid conflict issues with all devices and improve the performance of your Windows 11/10 PC.
[ad_2]
Source link
www.thewindowsclub.com