
[ad_1]
In this post, we’ll talk about how to fix Shared IPC Compositor Connect Failed 306 on SteamVR. Developed by Valve, SteamVR is a Virtual Reality Platform that offers a 360-degree view. The best thing about SteamVR is that it is compatible with Rift. But like anything else in the world, it also isn’t free from problems. Many users have reported facing the Error Starting SteamVR while using the application.
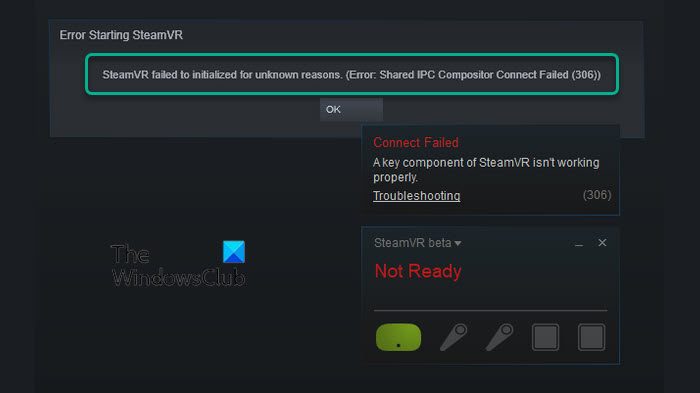
Error Starting SteamVR
SteamVR failed to initialize for unknown reasons, Error Shared IPC Compositor Connect Failed (306)

If you face the same error message, continue with the guide to fix the problem.
What causes Shared IPC Compositor Connect Failed 306 on SteamVR?
There can be multiple reasons behind Shared IPC Compositor Connect Failed 306 on SteamVR. But among all, the most common culprits are mentioned below.
- The main reason behind the problem can be a weak connection between the VR headset and the computer.
- If you haven’t downloaded the latest VR headset driver update, you will face the mentioned problem.
- If your system features a GPU driver that isn’t compatible with the SteamVR, you will most likely face the problem.
- The Steam Beta is another common culprit the Shared IPC Compositor Connect Failed 360 on SteamVR.
- The Natural Locomotion, designed for better usability, can also trigger the issue.
Now that you have a prior piece of knowledge about different reasons causing the issue let’s check out how to eliminate the problem.
Shared IPC Compositor Connect Failed 306 on SteamVR
Below is a list of all the effective solutions you can try to get rid of Shared IPC Compositor Connect Failed 306 on SteamVR.
- Perform basic troubleshooting steps
- Choose the SteamVR Beta
- Manually install the VR drivers
- Uninstall the Natural Locomotion software
Now, let’s take a look at all these solutions in detail.
1] Perform basic troubleshooting steps
Before getting into the technical workarounds, follow the below-mentioned basic troubleshooting steps. They will exclude the possibility of any silly mistake causing the problem.
- First off, restart Steam as well as the PC. It will eliminate any bug which might be causing the issue.
- Make sure to connect the SteamVR HDMI cable to the main HDMI port of the CPU. Additionally, remove any other unnecessary adaptor attached to the system.
- Remove any kind of camera attached to your Windows PC. Sometimes, the camera installed on your system can be the major reason causing the mentioned problem.
- Lastly, uninstall the RiftCat and ALVR drivers from your system. They both can conflict with each other wish you automatically cause the problem.
2] Choose the SteamVR Beta
The next thing you can try is to choose the SteamVR Beta. Many users have reported that the Shared IPC Compositor Connect Failed 306 on SteamVR problem was fixed by changing the SteamVR settings. You can go with the option as well and check if it makes any difference. The Beta for VR is set to none by default, but you can change it to solve the problem. Here are the steps you need to follow.
- To begin with, launch the Steam app on your Windows PC.
- Click on the Library option present at the top left corner.
- Choose the SteamVR option.
- Right-click on SteamVR, and from the context menu, choose the Properties option.
- Click on the BETAS tab.
- Click on the drop-down icon present under, Select the beta you would like to opt into, and from the available option, choose beta-SteamVR Beta Update.
- Now, close the Steam application.
SteamVR will now begin the update process. Once done, check if the problem is fixed or not. If not, try the next solution. Plus, change the settings back to None – Opt-out of all beta programs if you still face the problem.
See: SteamVR keeps telling us to update Graphics driver
3] Manually install the VR drivers
Manually downloading and installing the VR driver update is another effective solution you can try in this situation. As it turns out, an outdated or corrupted driver can be the major reason causing the mentioned problem. In this condition, the best thing you can do is download the latest driver update. Here is how it’s done.
- To begin with, remove the VR headset from your Windows PC.
- Right-click on the Windows icon present on the Taskbar, and from the popup control center, select the Device Manager option.
- Here you’ll find a list of all the installed drivers on your system.
- Locate and right-click on the VR are headset driver.
- From the context menu, choose the Update driver option.
- Now, follow the onscreen instruction to complete the update process.
Once done, check if the problem persists. If yes, continue with the guide.
Read: Fix SteamVR not working on Windows PC
4] Uninstall the Natural Locomotion software
Natural Locomotion is software that emulates input sent by the controller. It basically makes walking, running, and jumping a natural process. It comes along with the driver to do all these, especially for the SteamVR. But at the same time, if the driver isn’t compatible with the SteamVR Beta, you will face the mentioned problem. In this case, the best thing you can do is uninstall Natural Locomotion and run SteamVR with Motion Smoothing. Here are the steps you need to follow.
- Open the Run dialogue box by pressing Windows + R shortcut key.
- Type appwiz.cpl and press the enter key.
- Locate and right-click on the Natural Locomotion from the list of installed applications.
- From the context menu, choose the Uninstall option.
- Now, navigate to the location where you have installed Steam.
- Open the Config folder.
- Locate and delete the locomotion folders.
That’s it.
How do I fix SteamVR not working?
Depending on the cause, it’s very easy to fix SteamVR not working problem. You can try these methods to solve the problem: Run Steam in administrator mode, change the Power Plan of your PC, download the latest Graphics Driver update, turn off the SteamVR add-ons. Additionally, you try the SteamVR Beta and disable the in-game overlay to solve the problem.
How do I reinstall SteamVR?
It’s a cakewalk to reinstall SteamVR. Just right-click on SteamVR and select the Manage option. From the context menu, choose Uninstall. Now, click on SteamVR twice to begin reinstalling.
Read Next: How to fix SteamVR Error Code 436.
[ad_2]
Source link
www.thewindowsclub.com